Externalized Authorization using OPA and Spring Security
While OAuth2 and OIDC have become the de-facto standard for authentication and are very popular,
existing authorization standards (e.g. XACML, UMA) are difficult to implement and even use,
so developers continue to roll their own solutions, which is time-consuming and increases maintenance costs.
In this tutorial, we are going to look at how to simplify authorization by externalizing access control decisions using Open Policy Agent and Spring Security.
1. Goals
Typically, any service exposing API requires authentication and authorization. While the two terms may sound similar, authentication and authorization serve fundamentally different security purposes. Authentication is the process of determining identity, and authorization is the process of determining permissions. Both are very crucial topics, as insufficient attention to them is one of the most common sources of vulnerabilities (according to OWASP Top Ten), but we will focus on the authorization.
Authorization can be roughly divided into two categories: coarse-grained, such as RBAC (Role-Based Access Control), and fine-grained, such as ABAC (Attribute-Based Access Control), also known as PBAC (Policy-Based Access Control). Often, coarse-grained access control policies are enforced at the edge, but more fine-grained access control policies are implemented and enforced at the service level. This leads to difficulties in building service security and tight coupling of security policies with business logic, which negatively impacts developer productivity. Our goal is to externalize authorization, which allows developers to simply implement core business functionality and reuse common blocks for authorization, while access policies become centralized, so policy changes do not require changing the code of individual services.
2. Open Policy Agent
The Open Policy Agent (OPA) is an open-source policy engine that provides a simple API for delegating policy decisions to it.
When a service needs to make a policy decision, it queries OPA and provides structured data as input.
OPA evaluates the input against policies and data and generates output, which can also be an arbitrary data structure and is not limited to simple allow/deny responses.
OPA policies are expressed in a high-level declarative language called Rego.
More information about OPA and Rego can be found in the official documentation.
2.1. Running
For demonstration purposes, it will suffice to simply download the OPA binary from the GitHub releases and run it as a server:
./opa run --server
Or use the official OPA image and run it with Docker:
docker run -p 8181:8181 openpolicyagent/opa run --server
2.2. Policy
Let’s create a file named policy.rego and write a simple policy in it that will deny all requests:
package authz

default allow = false
We will use Policy API to create and update the policy:
curl -X PUT --data-binary @policy.rego localhost:8181/v1/policies/authz
2.3. Data
Typically, OPA policies require some data to make a decision, which can be loaded into OPA using various methods. Which method to use usually depends on the size of the data and the frequency of updates. Also, the way the data is loaded determines the way to access it when writing policies. Data sent with a policy decision request is accessed through an input variable. Data loaded asynchronously is always accessed through the data variable.
For our example, we will use a couple of the presented methods. We will include some of the data as part of the input. Another part of the data, containing the hierarchy of users in the organization, we will push to OPA using the Data API.
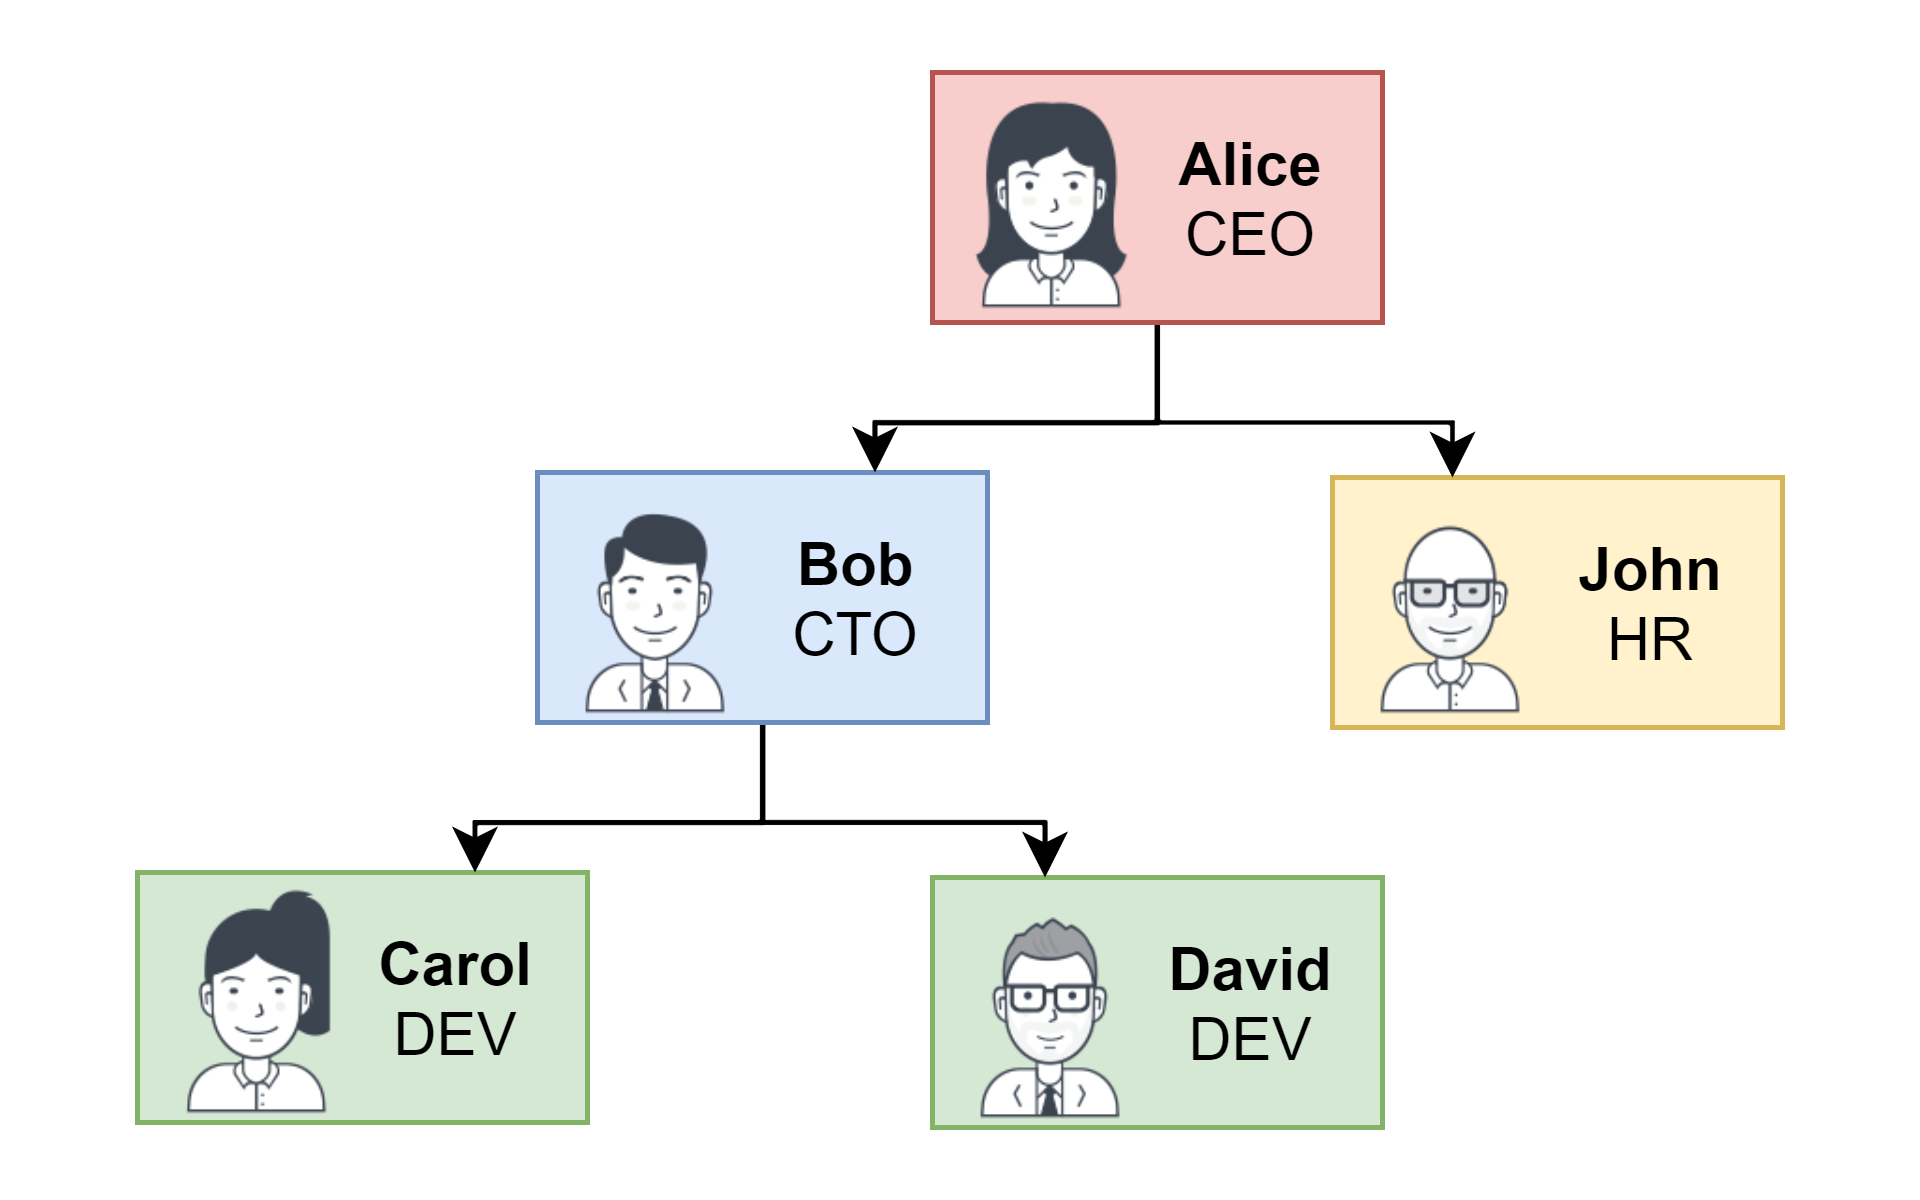
To do this, we create a file named data.json with the following content:
[
  {"name": "alice", "subordinates": ["bob", "john"]},
  {"name": "bob", "subordinates": ["carol", "david"]},
  {"name": "carol", "subordinates": []},
  {"name": "david", "subordinates": []},
  {"name": "john", "subordinates": []}
]
And load it into OPA:
curl -X PUT -H "Content-Type: application/json" -d @data.json localhost:8181/v1/data/users
3. Application
Now we need to build a service for which we will implement authorization. It will be a simple Spring Boot based web application providing an API for accessing two resources: salaries and documents.
3.1. Dependencies
First, we add the necessary dependencies:
<dependency>
    <groupId>org.springframework.boot</groupId>
    <artifactId>spring-boot-starter-web</artifactId>
</dependency>
<dependency>
    <groupId>org.springframework.boot</groupId>
    <artifactId>spring-boot-starter-security</artifactId>
</dependency>
<dependency>
    <groupId>org.springframework.boot</groupId>
    <artifactId>spring-boot-starter-data-jpa</artifactId>
</dependency>
<dependency>
    <groupId>com.h2database</groupId>
    <artifactId>h2</artifactId>
    <scope>runtime</scope>
</dependency>
3.2. Salary Components
Next, we create an entity class and the standard layered architecture components to represent salary:
@Entity
public class Salary {

    @Id
    @GeneratedValue(strategy = GenerationType.IDENTITY)
    private Long id;

    @Column(unique = true)
    private String username;
    private double amount;

    // getters, setters and overriden methods from UserDetails
}
@Repository
interface SalaryRepository extends CrudRepository<Salary, Long> {
Optional<Salary> findByUsername(String username);
}@Service
public class SalaryService {
private final SalaryRepository repository;
public SalaryService(SalaryRepository repository) {
this.repository = repository;
}
public Salary getSalaryByUsername(String username) {
return repository.findByUsername(username)
.orElseThrow(() -> new ResponseStatusException(HttpStatus.NOT_FOUND));
}
}@RestController
@RequestMapping("/salary")
public class SalaryController {
private final SalaryService service;
public SalaryController(SalaryService service) {
this.service = service;
}
@GetMapping("/{username}")
public Salary getSalary(@PathVariable String username) {
return service.getSalaryByUsername(username);
}
}3.3. Document Components
Then we create classes of the same type to represent document:
@Entity
public class Document {

    @Id
    @GeneratedValue(strategy = GenerationType.IDENTITY)
    private Long id;
    private String content;
    private String owner;

    // getters and setters
}
@Repository
interface DocumentRepository extends CrudRepository<Document, Long> {
}@Service
public class DocumentService {
private final DocumentRepository repository;
public DocumentService(DocumentRepository repository) {
this.repository = repository;
}
public Document getDocumentById(long id) {
return repository.findById(id)
.orElseThrow(() -> new ResponseStatusException(HttpStatus.NOT_FOUND));
}
}@RestController
@RequestMapping("/document")
public class DocumentController {
private final DocumentService service;
public DocumentController(DocumentService service) {
this.service = service;
}
@GetMapping("/{id}")
public Document getDocument(@PathVariable long id) {
return service.getDocumentById(id);
}
}3.4. Initial Data
We need some data, so we create an SQL script to initialize it at startup:
-- salaries
INSERT INTO salary (username, amount) VALUES ('alice', 1000);
INSERT INTO salary (username, amount) VALUES ('bob', 800);
INSERT INTO salary (username, amount) VALUES ('carol', 600);
INSERT INTO salary (username, amount) VALUES ('david', 500);
INSERT INTO salary (username, amount) VALUES ('john', 900);

-- documents
INSERT INTO document (content, owner) VALUES ('Alice Document 1', 'alice');
INSERT INTO document (content, owner) VALUES ('Bob Document 1', 'bob');
INSERT INTO document (content, owner) VALUES ('Bob Document 2', 'bob');
INSERT INTO document (content, owner) VALUES ('David Document 1', 'david');
INSERT INTO document (content, owner) VALUES ('David Document 2', 'david');
INSERT INTO document (content, owner) VALUES ('Carol Document 1', 'carol');
INSERT INTO document (content, owner) VALUES ('John Document 1', 'john');
3.5. Security
Our application is almost ready, all that remains is to configure web security. To keep the example simple, we’ll store the user’s credentials in memory and use HTTP Basic Authentication:
@Configuration
public class SecurityConfig extends WebSecurityConfigurerAdapter {

    @Bean
    public PasswordEncoder passwordEncoder() {
        return PasswordEncoderFactories.createDelegatingPasswordEncoder();
    }

    @Override
    protected void configure(AuthenticationManagerBuilder auth) throws Exception {
        auth.inMemoryAuthentication()
                .withUser("alice").password(passwordEncoder().encode("pass")).roles("CEO")
                .and()
                .withUser("bob").password(passwordEncoder().encode("pass")).roles("CTO")
                .and()
                .withUser("carol").password(passwordEncoder().encode("pass")).roles("DEV")
                .and()
                .withUser("david").password(passwordEncoder().encode("pass")).roles("DEV")
                .and()
                .withUser("john").password(passwordEncoder().encode("pass")).roles("HR");
    }

    @Override
    protected void configure(HttpSecurity http) throws Exception {
        http
                .authorizeRequests()
                .anyRequest().authenticated()
                .and()
                .formLogin().disable()
                .httpBasic();
    }
}
To make sure everything is working, we can run the application and try sending a couple of requests:
> curl localhost:8080/salary/david
{"timestamp":"2020-10-30T00:00:00.000+00:00","status":401,"error":"Unauthorized","message":"","path":"/salary/david"}
> curl carol:pass@localhost:8080/salary/david
{"id":4,"username":"david","amount":500.0}
As we would expect, the application works and requires authentication, but any user has access to other users’ salaries due to the lack of authorization checks.
4. Authorization
Finally, when the OPA server is up and the application is ready, we can move on to implementing authorization.
4.1 Using AccessDecisionVoter
Open Policy Agent contributors offer an integration for Spring Security which provides a simple implementation of AccessDecisionVoter that uses OPA for making API authorization decisions. Since it is quite easy to implement this class ourselves, and we can make better implementation, we will not use this dependency.
We need to implement AccessDecisionVoter that will collect available data that may be of interest for a policy decision,
send it to OPA for evaluation, and, depending on the result, either grant access or deny it.
Our implementation will send the authenticated user’s name, the list of their authorities,
the HTTP method, and the request path as a segment-separated array.
Dividing the path into segments will make it easier for us to access the path variables when writing policies.
Also, to make it clearer what is happening, we will log all sent requests and received responses:
public class OpaVoter implements AccessDecisionVoter<FilterInvocation> {

    private static final String URI = "http://localhost:8181/v1/data/authz/allow";
    private static final Logger LOG = LoggerFactory.getLogger(OpaVoter.class);

    private final ObjectMapper objectMapper = new ObjectMapper();
    private final RestTemplate restTemplate = new RestTemplate();

    @Override
    public boolean supports(ConfigAttribute attribute) {
        return true;
    }

    @Override
    public boolean supports(Class clazz) {
        return FilterInvocation.class.isAssignableFrom(clazz);
    }

    @Override
    public int vote(Authentication authentication, FilterInvocation filterInvocation, Collection<ConfigAttribute> attributes) {
        String name = authentication.getName();
        List<String> authorities = authentication.getAuthorities()
                .stream()
                .map(GrantedAuthority::getAuthority)
                .collect(Collectors.toUnmodifiableList());
        String method = filterInvocation.getRequest().getMethod();
        String[] path = filterInvocation.getRequest().getRequestURI().replaceAll("^/|/$", "").split("/");

        Map<String, Object> input = Map.of(
                "name", name,
                "authorities", authorities,
                "method", method,
                "path", path
        );

        ObjectNode requestNode = objectMapper.createObjectNode();
        requestNode.set("input", objectMapper.valueToTree(input));
        LOG.info("Authorization request:\n" + requestNode.toPrettyString());

        JsonNode responseNode = Objects.requireNonNull(restTemplate.postForObject(URI, requestNode, JsonNode.class));
        LOG.info("Authorization response:\n" + responseNode.toPrettyString());

        if (responseNode.has("result") && responseNode.get("result").asBoolean()) {
            return ACCESS_GRANTED;
        } else {
            return ACCESS_DENIED;
        }
    }
}
We can now define AccessDecisionManager bean with a list of voters, including our custom one, and configure Spring Security to use it:
public class SecurityConfig extends WebSecurityConfigurerAdapter {

    // ...

    @Override
    protected void configure(HttpSecurity http) throws Exception {
        http
                .authorizeRequests()
                .anyRequest().authenticated()
                .accessDecisionManager(accessDecisionManager())
                .and()
                .formLogin().disable()
                .httpBasic();
    }

    @Bean
    public AccessDecisionManager accessDecisionManager() {
        List<AccessDecisionVoter<?>> decisionVoters = List.of(
                new RoleVoter(), new AuthenticatedVoter(), new OpaVoter()
        );
        return new UnanimousBased(decisionVoters);
    }
}
4.2 Policies
Since we only have one policy that denies all requests, no matter which user tries to request salary or any user, they will get 403:
> curl alice:pass@localhost:8080/salary/alice
{"timestamp":"2020-10-30T00:00:00.000+00:00","status":403,"error":"Forbidden","message":"","path":"/salary/alice"}
> curl alice:pass@localhost:8080/salary/bob
{"timestamp":"2020-10-30T00:00:00.000+00:00","status":403,"error":"Forbidden","message":"","path":"/salary/bob"}
So, it’s time for us to take a look at how to write policies. Let’s start with the simplest and give users access to their salary.
To do this, we need to update policy.rego by adding the following:
allow {
  some username
  input.method == "GET"
  input.path = ["salary", username]
  input.name == username
}
Now, if you haven’t forgotten to push the policy update to OPA, all users got access to their salaries and still don’t have access to someone else’s:
> curl alice:pass@localhost:8080/salary/alice
{"id":1,"username":"alice","amount":1000.0}
> curl alice:pass@localhost:8080/salary/bob
{"timestamp":"2020-10-30T00:00:00.000+00:00","status":403,"error":"Forbidden","message":"","path":"/salary/bob"}
Isn’t that awesome? We didn’t even have to restart our application.
We can also add a role-based policy, for example, give a user with the HR role access to all salaries:
allow {
  input.method == "GET"
  input.path = ["salary", _]
  input.authorities[_] == "ROLE_HR"
}
Now a user with this role has access to the salaries of all users:
> curl john:pass@localhost:8080/salary/alice
{"id":1,"username":"alice","amount":1000.0}
> curl john:pass@localhost:8080/salary/david
{"id":4,"username":"david","amount":500.0}
So far, in all our policies, we have used input data, we will try to write a policy using data loaded into OPA. For example, we can give users access to the salaries of their direct subordinates:
allow {
  some username, i
  input.method == "GET"
  input.path = ["salary", username]
  data.users[i].name == input.name
  data.users[i].subordinates[_] == username
}
Users have now gained access to the salaries of their direct subordinates, but we do not support the full hierarchy of the organization:
> curl bob:pass@localhost:8080/salary/david
{"id":4,"username":"david","amount":500.0}
> curl alice:pass@localhost:8080/salary/bob
{"id":2,"username":"bob","amount":800.0}
> curl alice:pass@localhost:8080/salary/david
{"timestamp":"2020-10-30T00:00:00.000+00:00","status":403,"error":"Forbidden","message":"","path":"/salary/david"}
In order to give users access to all their subordinates at all levels, we need to write a more complex policy and, fortunately,
Rego gives us this opportunity by providing a large number of useful functions.
Since our hierarchy is a graph, and our task is to find reachable vertices for every vertex, we can use the appropriate function graph.reachable.
Using some functions may require preprocessing of data, for example, in this case, we need to “flatten” our data,
presenting it as a map, in which the user is the key, and the subordinates are the value, i.e:
{
  "alice": ["bob", "john"],
  "bob": ["carol", "david"],
  "carol": [],
  "david": [],
  "john": []
}
Rego allows us to define rules that support automatic iteration over data and generate output that is accessible in the same way as JSON objects. First, we add a rule to produce a graph by flattening our data:
users_graph[data.users[username].name] = edges {
  edges := data.users[username].subordinates
}
Next, we add a rule, which applies the appropriate function on the graph produced by the previous rule, to get all reachable users for each user:
users_access[username] = access {
  users_graph[username]
  access := graph.reachable(users_graph, {username})
}
As a result, we get data that looks like this:
{
  "alice": ["alice", "bob", "john", "carol", "david"],
  "bob": ["bob", "carol", "david"],
  "carol": ["carol"],
  "david": ["david"],
  "john": ["john"]
}
Now we can write a policy based on this data, and since it already provides users with access to their salaries and the salaries of their direct subordinates, we can delete the previous policies:
package authz

default allow = false

allow {
  input.method == "GET"
  input.path = ["salary", _]
  input.authorities[_] == "ROLE_HR"
}

allow {
  some username
  input.method == "GET"
  input.path = ["salary", username]
  username == users_access[input.name][_]
}

users_graph[data.users[username].name] = edges {
  edges := data.users[username].subordinates
}

users_access[username] = access {
  users_graph[username]
  access := graph.reachable(users_graph, {username})
}
Let’s check that the authorization works in accordance with our policies:
> curl alice:pass@localhost:8080/salary/alice
{"id":1,"username":"alice","amount":1000.0}
> curl alice:pass@localhost:8080/salary/david
{"id":4,"username":"david","amount":500.0}
> curl david:pass@localhost:8080/salary/alice
{"timestamp":"2020-10-30T00:00:00.000+00:00","status":403,"error":"Forbidden","message":"","path":"/salary/alice"}
> curl john:pass@localhost:8080/salary/alice
{"id":1,"username":"alice","amount":1000.0}
4.3 Using Annotations
You’ve probably already noticed that all our policies are applied only to access to salaries, and the documents were left aside and no user still has access to them.
The problem is that the data currently stored in OPA and being sent from AccessDecisionVoter may not be enough to make an authorization decision.
We cannot load all the data into OPA as the data can be highly dynamic or large-sized,
and if we start adding separate logic for each request to AccessDecisionVoter, this class will simply turn into a mess.
One solution to this problem might be to make OPA pull data during evaluation using built-in functions.
This can be a good solution when implementing edge authorization, but since we are now implementing authorization in the service itself,
it is easier for us to initially send all the necessary data to OPA and minimize the number of requests between services.
Additionally, we might want to have more control over when OPA is called, rather than doing it for every request.
Another authorization mechanism besides the use of access-decision voters provided by Spring Security is the ability to use SpEL expressions for the web and method security. We will apply expressions at the method level using some annotations that support them. To enable global Method Security and pre/post annotations, we need to add the following annotation to one of our configuration files:
@EnableGlobalMethodSecurity(prePostEnabled = true)We could use common hasPermission() expression by implementing PermissionEvaluator, but that would tie us to using the methods of this interface,
instead we will take advantage of the ability of expressions to reference and use methods of any Spring Bean.
Let’s get rid of our AccessDecisionVoter and create a component that will be used in expressions:
@Component
public class OpaClient {

    private static final String URI = "http://localhost:8181/v1/data/authz/allow";
    private static final Logger LOG = LoggerFactory.getLogger(OpaClient.class);

    private final ObjectMapper objectMapper = new ObjectMapper();
    private final RestTemplate restTemplate = new RestTemplate();

    public boolean allow(String action, Map<String, Object> resourceAttributes) {
        Authentication authentication = SecurityContextHolder.getContext().getAuthentication();
        if (authentication == null || !authentication.isAuthenticated() || action == null || resourceAttributes == null || resourceAttributes.isEmpty()) {
            return false;
        }

        String name = authentication.getName();
        List<String> authorities = authentication.getAuthorities()
                .stream()
                .map(GrantedAuthority::getAuthority)
                .collect(Collectors.toUnmodifiableList());
        Map<String, Object> subjectAttributes = Map.of(
                "name", name,
                "authorities", authorities
        );


        Map<String, Object> input = Map.of(
                "subject", subjectAttributes,
                "resource", resourceAttributes,
                "action", action
        );

        ObjectNode requestNode = objectMapper.createObjectNode();
        requestNode.set("input", objectMapper.valueToTree(input));
        LOG.info("Authorization request:\n" + requestNode.toPrettyString());

        JsonNode responseNode = Objects.requireNonNull(restTemplate.postForObject(URI, requestNode, JsonNode.class));
        LOG.info("Authorization response:\n" + responseNode.toPrettyString());

        return responseNode.has("result") && responseNode.get("result").asBoolean();
    }
}
The component we have implemented has only one method that takes the requested action and the attributes of the resource to which access is requested as arguments and sends all this data along with authentication data to OPA for a decision, which then returns as a boolean type.
We can now apply it using @PreAuthroze annotation in SalaryService:
@PreAuthorize("@opaClient.allow('read', T(java.util.Map).of('type', 'salary', 'user', #username))")
public Salary getSalaryByUsername(String username) {
    return repository.findByUsername(username)
            .orElseThrow(() -> new ResponseStatusException(HttpStatus.NOT_FOUND));
}
And using @PostAuthorize annotations in DocumentService:
@PostAuthorize("@opaClient.allow('read', T(java.util.Map).of('type', 'document', 'owner', returnObject.owner))")
public Document getDocumentById(long id) {
    return repository.findById(id)
            .orElseThrow(() -> new ResponseStatusException(HttpStatus.NOT_FOUND));
}
It remains only to adjust the previous policies for the new data format, as well as add a policy for documents, for example, by giving users access to their documents:
package authz

default allow = false

allow {
  input.action == "read"
  input.resource.type == "salary"
  input.subject.authorities[_] == "ROLE_HR"
}

allow {
  input.action == "read"
  input.resource.type == "salary"
  input.resource.user == users_access[input.subject.name][_]
}

allow {
  input.action == "read"
  input.resource.type == "document"
  input.resource.owner == input.subject.name
}

users_graph[data.users[username].name] = edges {
  edges := data.users[username].subordinates
}

users_access[username] = access {
  users_graph[username]
  access := graph.reachable(users_graph, {username})
}
And finally, let’s make sure everything works for both salaries and documents:
> curl alice:pass@localhost:8080/salary/bob
{"id":2,"username":"bob","amount":800.0}
> curl john:pass@localhost:8080/salary/bob
{"id":2,"username":"bob","amount":800.0}
> curl bob:pass@localhost:8080/salary/john
{"timestamp":"2020-10-30T00:00:00.000+00:00","status":403,"error":"Forbidden","message":"","path":"/salary/john"}
> curl alice:pass@localhost:8080/document/1
{"id":1,"content":"Alice Document 1","owner":"alice"}
> curl alice:pass@localhost:8080/document/2
{"timestamp":"2020-10-30T00:00:00.000+00:00","status":403,"error":"Forbidden","message":"","path":"/document/2"}
> curl bob:pass@localhost:8080/document/2
{"id":2,"content":"Bob Document 1","owner":"bob"}
5. Conclusion
This was a simple example showing how we can delegate authorization decisions to the Open Policy Agent and enforce them with Spring Security in both edge services and standalone microservices.
Full source code can be found on GitHub.