LangChain4j: Multi-Agent System using State Machine
In modern software, complex tasks often exceed the capabilities of a single AI agent—autonomous entities designed to perform specific tasks.
Collaborative multi-agent systems enable these agents to work together, leveraging their unique specializations, sharing context, and dynamically tackling problems that single agents can’t manage alone.
In this tutorial, we’ll create a multi-agent system using LangChain4j and Spring State Machine, showcasing how agents can interact, share memory, and delegate tasks efficiently.
1. Introduction
Managing workflows with multiple agents is challenging due to the complexity of coordinating interactions and maintaining control over process flow. By combining LangChain4j and Spring State Machine, we can build a flexible, effective multi-agent system capable of handling complex workflows.
- LangChain4j: Simplifies the creation of applications using LLMs but lacks built-in support for orchestrating multi-agent systems with feedback loops.
- Spring State Machine: Provides structured workflow management through states, transitions, and events, enhancing control and error handling.
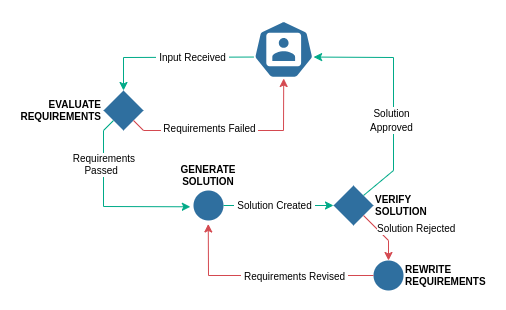
In this tutorial, we’ll build a multi-agent system to evaluate requirements, generate solutions, and iteratively verify outputs through the following steps:
- User Input: Initial requirements are provided.
- Requirements Evaluation: The system assesses feasibility, providing feedback if adjustments are needed.
- Solution Generation: A Python script is generated based on validated requirements.
- Solution Verification: The script is checked against the initial requirements.
- Requirements Refinement: If needed, the system refines requirements and loops back to improve the solution.
- Final Output: The verified solution is presented to the user.
2. Setting Up the Project
We start by creating a Spring Boot project using Java 17 or higher and adding the following dependencies for LangChain4j and Spring State Machine to pom.xml:
<dependencies>
    <dependency>
        <groupId>dev.langchain4j</groupId>
        <artifactId>langchain4j-spring-boot-starter</artifactId>
        <version>0.33.0</version>
    </dependency>
    <dependency>
        <groupId>dev.langchain4j</groupId>
        <artifactId>langchain4j-open-ai-spring-boot-starter</artifactId>
        <version>0.33.0</version>
    </dependency>
    <dependency>
        <groupId>org.springframework.statemachine</groupId>
        <artifactId>spring-statemachine-starter</artifactId>
        <version>4.0.0</version>
    </dependency>
</dependencies>
Note: We will use OpenAI models, but any other LLM can be used.
Next, we add the following properties in application.properties to use the demo key provided by LangChain4j:
langchain4j.open-ai.chat-model.api-key=demo
langchain4j.open-ai.chat-model.model-name=gpt-3.5-turbo
Note: The demo key is free for demonstration purposes but has a quota limit.
3. Implementing Agents
To create a functional multi-agent system, we implement specialized agents using LangChain4j. Each agent plays a unique role in evaluating, generating, verifying, and refining solutions based on user requirements.
3.1. Requirements Evaluator
This agent evaluates the feasibility of user-provided requirements:
@AiService
public interface RequirementsEvaluator {
    @UserMessage("""
        Evaluate the given requirements to determine if they are clear, concise, and feasible to implement in a single Python file.
        Return true if the requirements are clear and achievable; otherwise, return false.

        Requirements:
        """)
    boolean areRequirementsFeasible(@V("requirements") String requirements);
}
3.2. Script Generator
Generates a Python script based on approved requirements:
@AiService
public interface ScriptGenerator {
    @UserMessage("""
        You are an expert Python developer. Create only the Python CLI application script based on the given requirements.
        Do not include any explanations, comments, or additional text—only the code itself.

        Requirements:
        """)
    String generateScript(@V("requirements") String requirements);
}
3.3. Solution Verifier
Validates the generated script against the initial requirements:
@AiService
public interface SolutionVerifier {
    @UserMessage("""
        Review the provided Python script to ensure it accurately solves the problem as described in the requirements.
        If the script does not meet the requirements, return false and specify the issues.

        Requirements:
        Script:
        """)
    boolean isScriptValid(@V("script") String script, @V("requirements") String requirements);
}
Note: For a more robust system, we could integrate LangChain4j’s tool execution feature to run and test the generated code automatically. However, this example keeps the focus on basic interactions to maintain simplicity.
3.4. Requirements Rewriter
Refines requirements if the solution fails verification:
@AiService
public interface RequirementsRewriter {
    @UserMessage("""
        The following Python script failed to meet the specified requirements.
        Rewrite the requirements to incorporate necessary improvements while maintaining the original intent.

        Requirements:
        Script:

        Return the improved requirements.
        """)
    String rewriteRequirements(@V("requirements") String requirements, @V("script") String script);
}
4. Configuring State Machine
To manage the workflow between agents, we configure Spring State Machine to define states, events, and transitions, giving us precise control over the system’s behavior.
4.1. Defining States, Events and Variables
We start by defining states and events as enums to represent the steps in the workflow. Each state represents a stage of the process, while events trigger transitions between these stages:
enum States {
    AWAITING_INPUT, REQUIREMENTS_EVALUATION, SCRIPT_GENERATION, SOLUTION_VERIFICATION, REQUIREMENTS_REVISION, SUCCESSFUL_COMPLETION, INVALID_REQUIREMENTS
}

enum Events {
    INPUT_RECEIVED, REQUIREMENTS_EVALUATED, REQUIREMENTS_REJECTED, SCRIPT_GENERATED, SOLUTION_VERIFIED, SOLUTION_REJECTED, REQUIREMENTS_REWRITTEN,
}
We also define constants for variables that will be used in the state machine to pass information between states:
class Variables {
    public static final String REQUIREMENTS = "requirements";
    public static final String SCRIPT = "script";
}
4.2. Creating Configuration
We create a configuration class to define the state machine’s behavior and inject agents to manage interactions:
@Configuration
@EnableStateMachineFactory
class StateMachineConfig extends StateMachineConfigurerAdapter<States, Events> {
  private final RequirementsEvaluator requirementsEvaluator;
  private final ScriptGenerator scriptGenerator;
  private final SolutionVerifier solutionVerifier;
  private final RequirementsRewriter requirementsRewriter;

  // Constructor
}
4.3. Defining State Transitions
We set up transitions between states based on events, defining how the state machine moves from one state to another:
@Override
public void configure(StateMachineTransitionConfigurer<States, Events> transitions) throws Exception {
    transitions
            .withExternal().source(States.AWAITING_INPUT).target(States.REQUIREMENTS_EVALUATION).event(Events.INPUT_RECEIVED)
            .and()
            .withExternal().source(States.REQUIREMENTS_EVALUATION).target(States.SCRIPT_GENERATION).event(Events.REQUIREMENTS_EVALUATED)
            .and()
            .withExternal().source(States.REQUIREMENTS_EVALUATION).target(States.INVALID_REQUIREMENTS).event(Events.REQUIREMENTS_REJECTED)
            .and()
            .withExternal().source(States.SCRIPT_GENERATION).target(States.SOLUTION_VERIFICATION).event(Events.SCRIPT_GENERATED)
            .and()
            .withExternal().source(States.SOLUTION_VERIFICATION).target(States.SUCCESSFUL_COMPLETION).event(Events.SOLUTION_VERIFIED)
            .and()
            .withExternal().source(States.SOLUTION_VERIFICATION).target(States.REQUIREMENTS_REVISION).event(Events.SOLUTION_REJECTED)
            .and()
            .withExternal().source(States.REQUIREMENTS_REVISION).target(States.SCRIPT_GENERATION).event(Events.REQUIREMENTS_REWRITTEN);
}
4.5. Configuring State Actions
We define actions that interact with agents and trigger the next state based on feedback:
private Action<States, Events> evaluateRequirementsAction() {
    return stateContext -> {
        log.info("Evaluating requirements...");
        var requirements = getVariable(stateContext, Variables.REQUIREMENTS);
        if (requirementsEvaluator.areRequirementsFeasible(requirements)) {
            sendEvent(stateContext.getStateMachine(), Events.REQUIREMENTS_EVALUATED);
        } else {
            sendEvent(stateContext.getStateMachine(), Events.REQUIREMENTS_REJECTED);
        }
    };
}

private Action<States, Events> generateScriptAction() {
    return stateContext -> {
        log.info("Generating script...");
        var requirements = getVariable(stateContext, Variables.REQUIREMENTS);
        var script = scriptGenerator.generateScript(requirements);
        stateContext.getExtendedState().getVariables().put(Variables.SCRIPT, script);
        sendEvent(stateContext.getStateMachine(), Events.SCRIPT_GENERATED);
    };
}

private Action<States, Events> verifySolutionAction() {
    return stateContext -> {
        log.info("Verifying solution...");
        var requirements = getVariable(stateContext, Variables.REQUIREMENTS);
        var script = getVariable(stateContext, Variables.SCRIPT);
        if (solutionVerifier.isScriptValid(requirements, script)) {
            sendEvent(stateContext.getStateMachine(), Events.SOLUTION_VERIFIED);
        } else {
            sendEvent(stateContext.getStateMachine(), Events.SOLUTION_REJECTED);
        }
    };
}

private Action<States, Events> rewriteRequirementsAction() {
    return stateContext -> {
        log.info("Rewriting requirements...");
        var requirements = getVariable(stateContext, Variables.REQUIREMENTS);
        var script = getVariable(stateContext, Variables.SCRIPT);
        var rewrittenRequirements = requirementsRewriter.rewriteRequirements(requirements, script);
        stateContext.getExtendedState().getVariables().put(Variables.REQUIREMENTS, rewrittenRequirements);
        sendEvent(stateContext.getStateMachine(), Events.REQUIREMENTS_REWRITTEN);
    };
}

private String getVariable(StateContext<States, Events> stateContext, String key) {
    return stateContext.getExtendedState().getVariables().get(key).toString();
}

private void sendEvent(StateMachine<States, Events> stateMachine, Events event) {
    var message = MessageBuilder.withPayload(event).build();
    stateMachine.sendEvent(Mono.just(message)).subscribe();
}
Finally, we assign specific actions to each state:
@Override
public void configure(StateMachineStateConfigurer<States, Events> states) throws Exception {
    states
            .withStates()
            .initial(States.AWAITING_INPUT)
            .state(States.REQUIREMENTS_EVALUATION, evaluateRequirementsAction())
            .state(States.SCRIPT_GENERATION, generateScriptAction())
            .state(States.SOLUTION_VERIFICATION, verifySolutionAction())
            .state(States.REQUIREMENTS_REVISION, rewriteRequirementsAction())
            .end(States.SUCCESSFUL_COMPLETION)
            .end(States.INVALID_REQUIREMENTS);
}
5. Implementing Workflow Service
Now, we implement a WorkflowService that manages the execution of the state machine.
This service initializes the state machine, starts the workflow, listens for state changes, and provides results or feedback on failures using a combination of state listeners and CompletableFuture:
@Service
public class WorkflowService {
    private static final Logger log = LoggerFactory.getLogger(WorkflowService.class);
    private final StateMachineFactory<States, Events> factory;

    WorkflowService(StateMachineFactory<States, Events> factory) {
        this.factory = factory;
    }

    public String generateScript(String requirements) {
        var resultFuture = new CompletableFuture<String>();
        var stateMachine = factory.getStateMachine();
        addStateListener(stateMachine, resultFuture);

        try {
            stateMachine.startReactively()
                    .doOnError(resultFuture::completeExceptionally)
                    .subscribe();

            // Set the initial requirements variable and trigger the first event
            stateMachine.getExtendedState().getVariables().put(Variables.REQUIREMENTS, requirements);
            stateMachine.sendEvent(Mono.just(MessageBuilder.withPayload(Events.INPUT_RECEIVED).build())).subscribe();

            return resultFuture.get(30, TimeUnit.SECONDS);
        } catch (Exception e) {
            log.error("State machine execution failed: " + e.getMessage());
            throw new IllegalStateException(e);
        } finally {
            stateMachine.stopReactively().block();
        }
    }

    private void addStateListener(StateMachine<States, Events> stateMachine, CompletableFuture<String> resultFuture) {
        stateMachine.addStateListener(new StateMachineListenerAdapter<>() {
            @Override
            public void stateChanged(State<States, Events> from, State<States, Events> to) {
                if (to != null) {
                    if (to.getId() == States.SUCCESSFUL_COMPLETION) {
                        Object resultObj = stateMachine.getExtendedState().getVariables().get(Variables.SCRIPT);
                        if (resultObj != null) {
                            resultFuture.complete(resultObj.toString());
                        } else {
                            log.error("Script not found at successful completion");
                            resultFuture.completeExceptionally(new IllegalStateException("Script not found at successful completion state"));
                        }
                    } else if (to.getId() == States.INVALID_REQUIREMENTS) {
                        log.warn("Workflow ended due to invalid requirements.");
                        resultFuture.complete("Invalid requirements: Your input is either unclear or too complex.");
                    }
                }
            }

            @Override
            public void stateMachineError(StateMachine<States, Events> stateMachine, Exception exception) {
                log.error("State machine encountered an error: " + exception.getMessage());
                resultFuture.completeExceptionally(exception);
            }
        });
    }
}
6. Testing the Application
To verify our multi-agent system, we implement a simple CommandLineRunner that interacts with the WorkflowService.
This runner starts the application, prompts for user input, and outputs the generated Python script, demonstrating the complete workflow:
@Bean
CommandLineRunner commandLineRunner(WorkflowService workflowService) {
    return args -> {
        try (Scanner scanner = new Scanner(System.in)) {
            System.out.println("""
                    Welcome to the Python CLI Application Generator!

                    Please describe the requirements for the application you need.
                    Clearly specify the desired functionality in a concise manner,
                    ensuring it can be implemented in a single Python file.

                    Example: "Create a Python CLI that converts temperatures between Celsius and Fahrenheit."

                    Enter your requirements below:
                    """);

            System.out.print("> ");
            String userInput = scanner.nextLine().trim();

            if (userInput.isEmpty()) {
                System.out.println("No input provided. Exiting...");
                return;
            }

            try {
                String response = workflowService.generateScript(userInput);
                System.out.println("\n--- Result ---\n");
                System.out.println(response);
                System.out.println("\n----------------\n");
            } catch (Exception e) {
                System.err.println("An error occurred while processing your request: " + e.getMessage());
            }

        } catch (Exception e) {
            System.err.println("An unexpected error occurred: " + e.getMessage());
        }
    };
}
Now we can start the application and test the workflow by providing requirements and observing the generated Python script.
Conclusion
In this article, we explored building a multi-agent system using LangChain4j and Spring State Machine. We demonstrated how to create collaborative agents, manage their interactions, and implement an iterative workflow for refining requirements and solutions. While we covered a straightforward use case, this approach can be scaled to more complex applications by leveraging LangChain4j’s features like tool execution and RAG, along with advanced Spring State Machine capabilities such as guards, junctions, and forks.
Full source code can be found on GitHub.